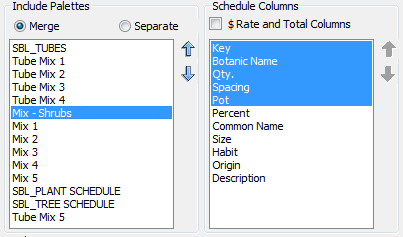
 First select a single item in the Include
Palettes list as shown in the screenshot.
First select a single item in the Include
Palettes list as shown in the screenshot.|
Schedule
Layout
|
A schedule layout can be customised with varied column orders. You can optionally choose to include a symbol column which will place a graphic element such as a hatch or block in the first column of the schedule.
First select a single item in the Include
Palettes list as shown in the screenshot.
The field names or columns associated with the palette can be
selected or deselected in the Schedule
Columns window to the right.
Reorder by selecting one at a time and using the arrow buttons. After specifying the column order, highlight each item to be included in the schedule by clicking and dragging with the mouse or using the control key to select or deselect a column name.
Each selection and its order is saved with its associated list.  You can set a default order and selection
by clicking the
'Set Default Columns' button.
This will apply the current column selection and order as a default for
all lists of the same type (Individual / Mix / Finish) in the current
schedule definition and for
new
drawings.
You can set a default order and selection
by clicking the
'Set Default Columns' button.
This will apply the current column selection and order as a default for
all lists of the same type (Individual / Mix / Finish) in the current
schedule definition and for
new
drawings.
After specifying the columns for each list, select or highlight the
lists to be
included in the schedule in the left hand column (see below).
Use the
mouse and control key to select or deselect a list to be inlcuded.
 When a 'Separate' schedule is
specified, each list will be output separately using the list name as
the title.
When a 'Separate' schedule is
specified, each list will be output separately using the list name as
the title.
When 'Merge' is specified,
multiple lists in the selection will be combined and titled with the
text in Schedule Title edit box.
When merging palettes, the column selection for the whole schedule
will be determined by the topmost list. In the screenshot at right,
only
columns for SBL_TUBES will be included in the schedule output,
regardless of the settings of the palettes below it.
 To include a symbol
column in the schedule for single or multiple lists, click
the Draw checkbox and use the default title for the column or specify a
new one. A custom
scale for blocks and swatches can be specified and will be updated when
the schedule is generated.
To include a symbol
column in the schedule for single or multiple lists, click
the Draw checkbox and use the default title for the column or specify a
new one. A custom
scale for blocks and swatches can be specified and will be updated when
the schedule is generated.
Check to include a Rate and Total column in the schedule. You can change the order of these additional columns using the arrow buttons and selection methods. When a schedule is generated, rates are applied to quantities and a Total row added at the bottom of the schedule.
Specify a custom label for the quantity field in the edit box and click the 'Apply' button. The custom field is applied only for the currently defined schedule. All other schedules will use the default quantity label specified on the Format tab.