Custom Labels
Label Definition
Labels can be customised by defining a combination of codes and text which appear on up to four lines.

On the left side of the dialog are buttons with captions representing each label element. Clicking a button places code defining the label into the line next to the cursor. Label code elements are enclosed by the “<” and “>” characters.

Include any text along with label codes. The example here shows a combination of text and codes on multiple lines. The text output includes the area, list name and a custom label.
Note you can use the small buttons at the bottom of the dialog to apply formatting to label elements.
Make a selection in the label format area and click one or a combination of format buttons. To remove formatting, highlight the formatted text and click the respective button.
Mix Lists
Plant mixes are defined a little differently to take account of multiple plants.
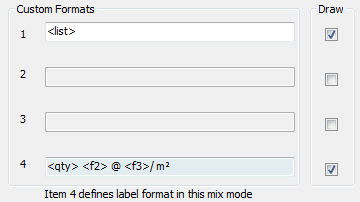
The fourth item is used to format each plant within the mix, leaving the first three line items for summary details. These can include a total number of plants – <total>, the area of the boundary or hatch, list name etc.

All three fields can be used, or just the 4th field.
In the example here, the 1st and 4th field are used to define the label.
Some fields can’t be used to generate reliable output in the first three lines of a mix mode including <qty>, <f1>, <f2>, <f3>, <f4> or <f5>.
Note:
Alternatively, the fourth field can be switched off so that details about each list item are not generated.
This approach works well in seed mode where the total weight for a given area can be displayed. Quantities are stored with the label and retrieved when generating a schedule.


You can specify the label format for the current list from the command line, ribbon or PlantMan menu.
From the command line, type ‘ppl’ at the prompt or click ‘Custom Label’ in the menu or ribbon.
Pre-set Formats

If a pre-set format is set for the list, the Pre-set Label dialog will open from which you can switch to another pre-set or a custom format by clicking the ‘Custom’ button.
Alternatively, from the custom dialog, switch to a pre-set label by clicking the ‘Preset’ button at the lower right of the dialog.