FAQ
Have something you can’t find an answer to? Please reach out, your questions may help others!
Getting Started and Setup
How do I display the PlantManager palette if it's missing?
Type ‘pal’ at the command line or click the “Show Palette” button on the PlantManager ribbon.
If you want the palette to appear automatically when starting new drawings, check the “Show Palette” checkbox on the right-hand side of the main dialog.
What's the difference between Individual, Mix, and Finishes lists?
- Individual lists: Used for single plant species assigned to polyline areas, hatches, or blocks
- Mix lists: Allow you to assign multiple species to a single boundary with specified ratios/percentages
- Finishes lists: Used for hardscape elements like paving, mulch, or furniture, quantified by area, length, or count
How do I create a plant list from scratch without importing?
- Click “New List” button on the palette
- Choose list type (Individual, Mix, or Finishes)
- Right-click in the lower palette panel and select “New…”
- Enter at minimum a key name for each plant
- Add spacing values for area-based plants, leave blank for symbols
Can I use the same plant in multiple lists?
Yes, you can have the same plant (with the same key name) in different lists.
PlantManager can synchronise the details of the same plants which are found in different lists when “Check Matching Items” in Options is checked.
For example, with this option checked if a minor change to the botanic name is made in one list, the same plant in another list will be updated to reflect the edit.
General
What CAD packages does PlantManager work with?
AutoCAD 2015 to 2026 (including Map3D, Civil 3D etc)
BricsCAD Version 18 to 25
AutoCAD LT 2015 to 2026 (requires CADSTA Max)
Can PlantManager work with AutoCAD for MacOS?
PlantManager doesn’t run natively on the Mac but can be run via a virtual machine like Parallels or virtualBox (free) on MacOS, to load Windows and in turn run AutoCAD.
Why has PlantManager disappeared from the ribbon in AutoCAD?
Rarely, the PlantMan.cuix file becomes orphaned. Try and unload the menu using the CUI command as follows:
- Type cui at the command prompt.
- Expand the partial customization files tree.
- At the bottom you should see a PlantMan menu item.
- Right click on this and unload it – it may be orphaned
- Close the CUI editor.
- Type menuload at the command line.
- Browse for the PlantMan.cuix file in its installation folder location.
- Load the menu file and close the dialog.
Known Issues
This section lists issues which have been noted in various scenarios or on specific platforms.
- In all versions of BricsCAD, it is not possible to use annotative text styles which are set when the ‘Use drawing annotation styles’ setting is current. (Options dialog)
If set, the default style for multileaders or dimensions will need to be non annotative. Alternatively, let PlantManager create text styles (the default setting) according to the plot scale.
Import / Export
Can I export a plant or finish list to an Excel file?
- Open the main dialog
- Click on the File button at the top right
- Select the list you want to export (if there is more than one list)
- Click on the save button
- In the Save as Copy dialog, select the External File option
- Choose a location to save the file
- A file with a .pla extension is saved.
- Open Excel and click Open
- Click the Browse button at the bottom of the Open tab to browse to the folder location where the file was saved
- Type in *.pla in the File Name edit box at the bottom and Enter
- Select the .pla file, click open
- Click Next with Delimited checked, delimiters should have Tab checked
- Click Next, you can choose column format
- Click Finish.
- Delete the top row (used to specify formating as a .pla file) and save as an Excel worksheet.
I can't seem to import Excel files?
There are a couple of reasons this can appear to be a problem.
If the software is unregistered, the Plants dialog will display but will fail to import or load plants from external sources. Solution: Register the software.
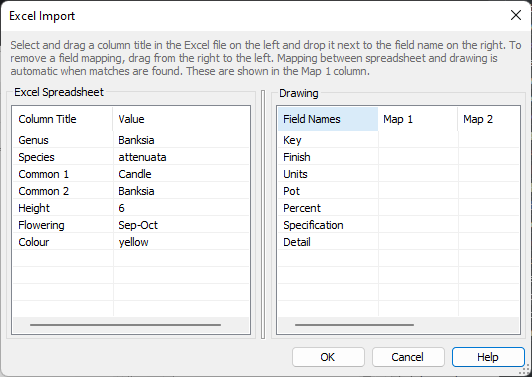
If the column names in the Excel file don’t match with any of the field names of the drawing you’re importing into, it may appear the import process has failed.
Use the Map Worksheet Fields function by clicking the button ![]() which will display the Excel Import dialog.
which will display the Excel Import dialog.
As can be seen in this screenshot, none of the column names correspond to field names of the list and all fields would need to be mapped.

Drawing
My drawing is setup in millimeter units - I want my finish list items to show sq. meters when using a custom label format?
 The default preset label format will display quantities in sq meters . If you use a custom label format you will need to specify the label format with an <area> field as shown in the screenshot.
To achieve this, you would click the button labelled ‘Key’ on the left, enter a space and then click the ‘Area’ button
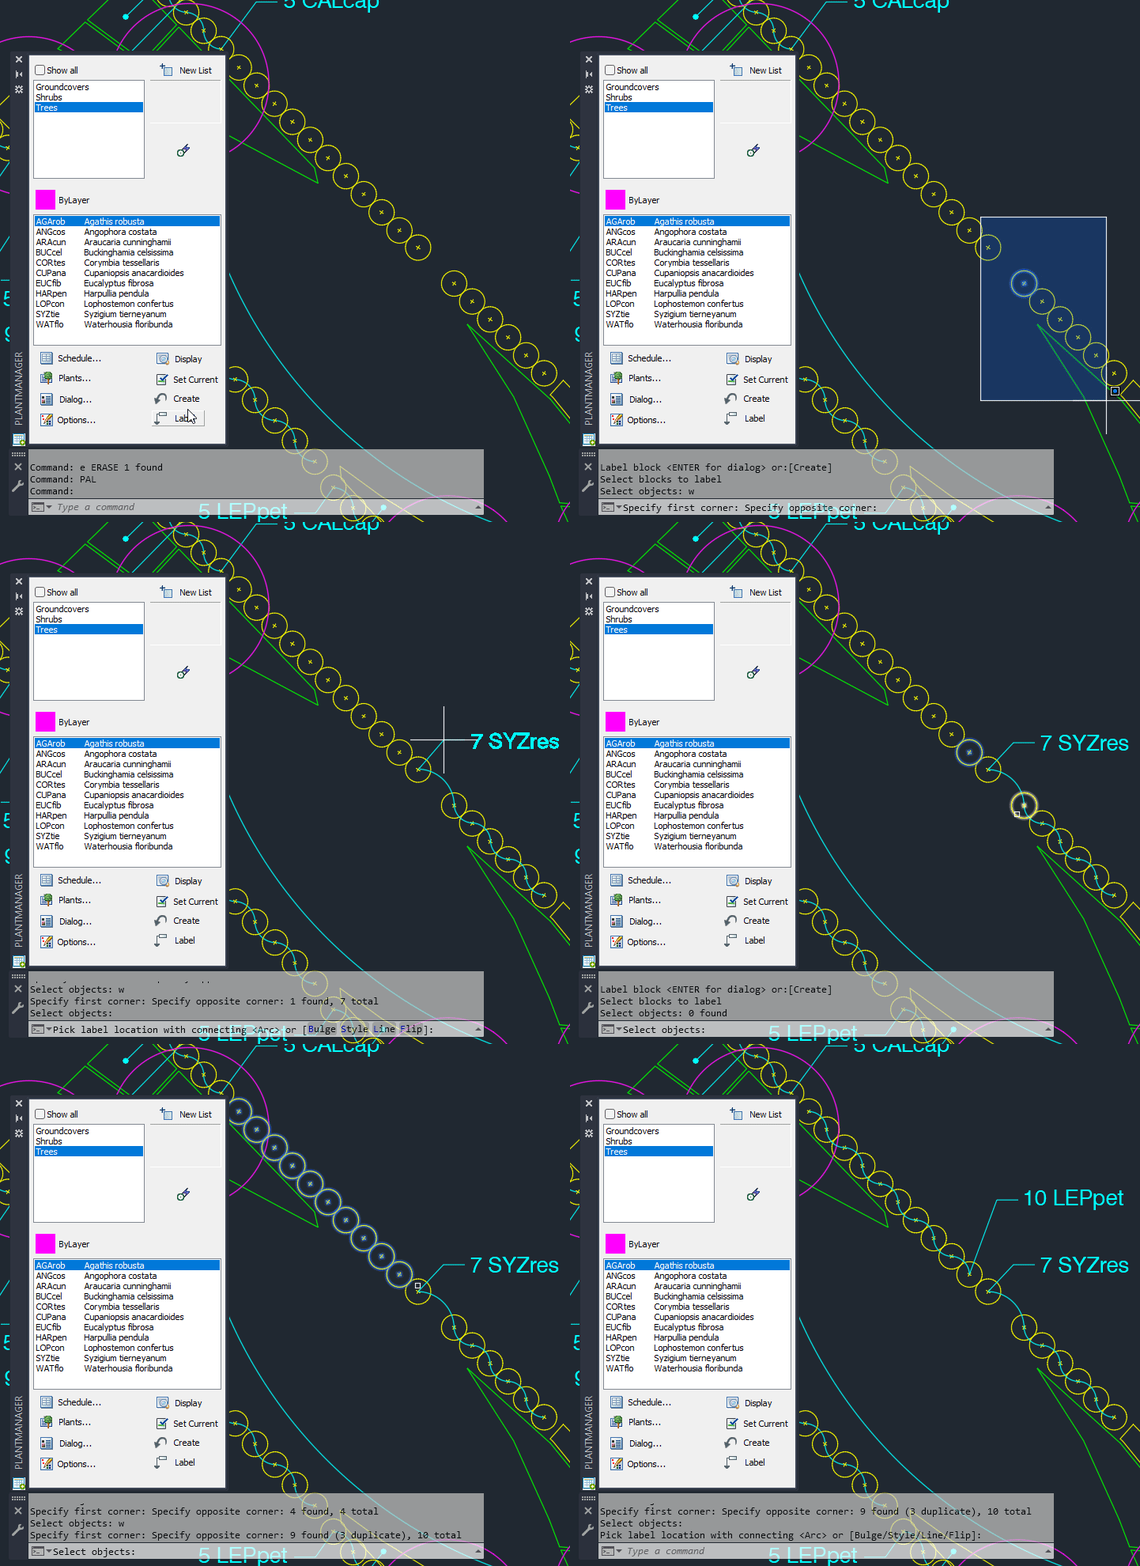
Can I use a window to select blocks to label instead of selecting them individually?
See the video below to learn how to select multiple blocks…

Can I copy PlantManager symbols along an alignment using the measure or divide command?
 Yes, you can. Use the PlantManager ribbon tools, Measure with block and Divide with block (MB or DB shortcuts).
Make sure the plant you want to insert is selected in the palette and follow the prompts at the command line.
These tools work in a similar way to the native AutoCAD Measure and Divide tools.
Can I update label sizes for trees / symbols without manually reinserting each item?
If PlantManager is using the drawing’s annotation styles, set a different text height for the default text style and then switch each tree label off then back on for each tree which has an attribute label.
Can I edit a drawing created with PlantManager without the software being installed on my computer?
Yes, there are no restrictions on editing a drawing created with PlantManger. You can modify planting or finish areas but when they are opened again with PlantManager, you will need to run the pmaudit command to update quantities according to the revised boundary areas.
Our office uses a standard layer for all planting plan annotations. Is it possible to do this with PlantManager?
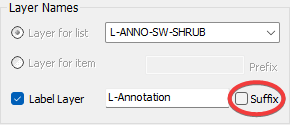
Yes, you can choose a specific layer for all PlantManager annotations. If there’s not already a layer in the drawing matching the standard name, it will be created. You can also choose a different layer for each list you create.
 To specify the layer, open the options dialog and edit the Layer Names section. If you want to use your own predefined layer for annotations, select Label Layer and deselect the default setting to use a suffix as shown in the screenshot here.
How do I add a new container size?
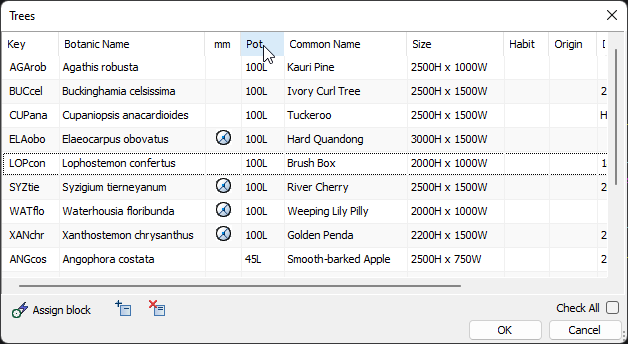
You can edit the container size in the main dialog… New entries will appear when you go to the spreadsheet view

Also you can click the Container Size button on the Options tab.
Changes made in this dialog are saved in the registry and will apply to new drawings.
I've created a planting plan and now want to change the label size to match a new plot scale...
Assuming you’ve created non-annotative labels using PlantManger-generated label styles (not using drawing annotation styles), an easy way to change label sizes involves changing them to be annotative.
- First, set the current annotative scale to match the PlantManager plotting scale.
- Select all labels in the drawing you want to change.
- In the properties palette, set the Annotative property to Yes.
- With all labels still selected, open the Annotative scale dialog from the properties palette, the current annotative scale will appear in the list
- Add a new annotative scale to match the viewport plotting scale the planting plan will appear in.
Can I copy and paste a planting plan into a new drawing file and resume editing the plan?
Yes you can but you need to use the pmlink command to connect labels to their boundaries. This assumes you’ve also imported the associated lists from the source drawing.
Once you’ve used the pmlink command to connect at least one label and its boundary, run the pmaudit command.
This will attempt to relink all labels with their respective boundaries. Those which are not reconnected can be manually linked using the pmlink command
Schedules
How can I export a schedule to Excel?
There are a couple of ways – in both cases by creating a .CSV file and opening it in Excel.
The Create a Schedule help page has details about exporting a comma delimited file when the schedule is created or updated.
Alternatively you can right click on a schedule and export the table to .CSV from CAD.
The schedule text size I want to use is not listed on the schedule format page. How can it be added?
You can change the text size (and style) to any configuration.
Say you want to change the default data row text size to 1.6mm in height.
- The first step is to generate a schedule.
- This creates a tablestyle based on the current plotting scale.
- Edit the tablestyle using the ‘tablestyle’ command.
- Select the table style for the scale – for 1:250 it would be named ‘PlantMan_250_Table’
- Then edit the cell style settings – choose the Data. 1.6mm text height at 1:250 would be 0.4 (with m as units)
Any further schedules you create will use the tablestyle setting.
Don’t use the PM Schedule Format tab to change anything or you will undo changes made to the style!
The plant spacing text output of the schedule doesn't match the setting displayed in the list. Can it be adjusted?
The spacing output in the schedule is set from a control in the schedule format tab.
Set the preferred spacing text format as shown in the screenshot here.

Can I format some schedule columns (like the Botanic Name) with italic text?
There are a couple of options:
- Prefix each botanic name with a backslash and the letter I like so: \I (that’s a capital i) so Acacia cognata becomes \IAcacia cognata. Everywhere this name is printed in the drawing it will be created in an italic style.
- Create an italic variant of the current text style. Select all cells in the column to change (drag a window). In the properties palette under content change the text style to the italic version.
Can I create a line break within text which will appear in the schedule?
Yes, use the main dialog to edit the text where you want to insert an invisible line break.
The Shift+Enter keys will create the line break.
Use the multi line edit boxes in the main dialog to enter text separated by line breaks as below

Is it possible to align symbols in the schedule so they appear at the top of the row?
There is a command named ‘symalign’ which can be used to specify the symbol position either at the top or middle of a row.
At the command prompt, type symalign
Specify default PlantManager schedule symbol column alignment <Middle> or [Top]:
The default position is at the top
In most cases, this setting will make no difference to the appearance of symbols in the schedule. It is only when information in the adjoining columns takes up more vertical space that the symbol alignment may need to be adjusted.
How can I sort the output of a schedule?

There is a drop-down selection button at the bottom of the format tab on the schedule dialog. The same control is found on the right-hand side of the main dialog.
You can also set the sort order of lists by clicking on the column headings in the spreadsheet view. Clicking one of the first four fields will apply the desired sort order. Clicking on other column headings will sort the spreadsheet contents but will not apply the sort order as a global setting.

Can I add a total row to a schedule?
 Add a total row to the schedule by checking the box at the bottom right of the expanded schedule dialog. You can specify a custom label to use, the default is ‘Total’.
Total quantities or areas will be calculated and displayed in the total row.