Getting Started
Introduction
After setting up, a PlantManager ribbon will be displayed.

Following installation, a palette will appear on the left-hand side of the screen. If the palette is closed, type ‘pal’ at the command line or click the left-hand ribbon button to redisplay it.
Open the sample drawing named Planting Sample.dwg in the installation folder to see how the palette is populated and explore the detail the software can help to create.
A screen menu is also available with shortcuts to frequently used tools.
See this page for an overview of the PlantManager workflow as a mindmap.
First Steps
What if you’re starting a new drawing and want to create a planting or finish plan from scratch? An outline of steps to take includes the following:
- You’ll be asked to confirm drawing units and plot scale when starting a new drawing.
- Create new lists (or import existing lists from another project). You can also skip this step and go directly to Step 3 if desired.
- Open the Plants dialog and populate the list/s or manually add entries.
- Set options for layers, label styles and annotation styles
- Check spacing of plants and decide which will appear as symbols
- Develop planting design – identify areas for various plant representations, refine mixes and specimens
- Place blocks and assign plants or mixes to area objects. Use the Create or Label modes to insert or assign plants in the drawing.
- Review and revise (often more than once!)
- Generate schedule/s
Palette Description
The palette provides quick access to PlantManager tools and functions from the drawing workspace.
It mostly reproduces the functions and editing tools available from the main dialog.

You can display the palette by typing ‘pal’ on the command line or by clicking the Show Palette button on the ribbon.
By default, the palette will not appear when starting a new drawing or opening a previous project however you can change the default behaviour by checking the Show Palette check box on the right-hand side of the main dialog.
Plants (or finishes) are defined in lists with each list displayed in the top left panel.
The entries contained within are shown in the bottom panel.
Properties of the selected entry are displayed in the top right of the palette – as shown in the screenshot – a plant image, hatch and line type swatches. Click the swatch (or symbol) to edit its properties and update the drawing with changes.
When you select a list in the top panel, its contents will be displayed in the bottom panel.
Shortcuts are located at the bottom of the palette including plant drawing tools on the right and buttons to set up lists and create schedules on the left.
Once a plant or finish has been defined, you can label or insert it using the ‘Label’ and ‘Create’ buttons at the bottom right of the palette.
Use the display button to show the location of existing objects in the drawing.
You can merge all lists together by checking the ‘Show All’ checkbox at the top of the palette. In this mode, when you click each entry in the lower panel, its parent list will be highlighted in the top panel. Note the panel will be disabled until the Show All checkbox is unchecked.
Palette Display
The position of each window in the palette can be adjusted by clicking and dragging adjacent borders. The palette can be permanently switched on or off by checking the ‘Palette display’ toggle on the right-hand side of the main dialog.
In its switched-off state, you can temporarily display the palette using a menu item or type ‘pal’ at the command prompt. As with all AutoCAD or BricsCAD palettes, you can double-click the title bar to undock the window and set the palette to auto-hide as needed.
The palette’s position and state (either docked or undocked) will be saved at the time the drawing is closed.
Create a new list

To create a new list, click on the ‘New List’ button at the top right of the palette.
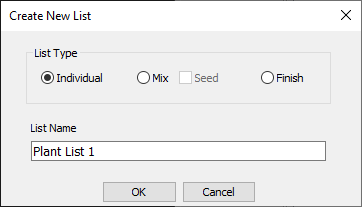
In the dialog which opens, select a list type to create and give it a name.
- An ‘Individual’ list allows you to create or assign a single species to a polyline area, hatch or block. This is the default mode of operation.
- A ‘Mix’ list allows you to create or assign a mix of species (plants or seeds) to a boundary or hatch object. The ratio or percentage between all items can be specified.
- A ‘Finishes’ list can be used for defining treatments which typically make up a surface treatment / general arrangement or furniture drawing and are quantified by their area, length or the number of items.
Add or Edit items
To add items to a list, click the ‘Plants’ button or right-click in the bottom panel of the palette and select New… from the submenu where you can enter data defining a new entry.
List items can be edited in place by double-clicking to open a spreadsheet view.

Alternatively, open the main dialog by clicking the bottom palette button. You can use the main dialog to change a single list item, edit multiple list items at once and set options.